
All you need to turn your bare hands into real silver from scratch are a spritz of metalworking bench, a roller mill, and multiple years in a goldsmithing workshop.
That’s the magic of silver clay — and it delivers.
Silver clay is a pliable substance made of tiny fine silver particles bound in water and an organic binder. You work it like modeling clay, mold it into whatever you want, let it dry and then fire it. The binder burns away, the silver particles sinter and fuse with one another, and what remains is a solid chunk of. 999 pure fine silver.
In this guide, I’ll take you through it all: what silver clay is, which brands to choose, the tools you need (and don’t), how to fire it safely and errors that will trip up almost every beginner. I’ll also address a few things that most tutorials leave out — such as what’s happening inside the metal during sintering, how to rescue pieces that crack and whether silver clay jewelry is truly strong enough for everyday use.
Let’s get into it.
1. What Is Silver Clay (And How Is It Different from Regular Clay)?
Pottery clay is made up of ground minerals and silica. Silver clay is made from real silver — ultra-fine silver, to be precise (particles that can measure just a few microns) mixed within a binder of mostly methylcellulose and water.
The firing of silver clay entails a three stage process:
- Water evaporates (already performed during the drying).
- At 300–400°C the organic binder burns off leaving pure silver powder.
- Above about 600°C, the silver particles start to sinter — a process whereby they bond at contact points without melting all the way through, forming a solid metal structure.
- The end product is fine silver that’s chemically and structurally the same as the silver you’d purchase from a metals supplier. It can be soldered, polished, hallmarked and worn daily.
💡 Quick Fact Fine silver (. 999) is way purer than. 925). It’s softer, but more tarnish-resistant. One note, fine silver is great for jewelry that doesn’t require high tensile strength (pendants, earrings, charms).
The concept was developed in the early 1990s by Mitsubishi Materials Corporation in Japan under the brand name PMC (Precious Metal Clay). It opened up fine silver jewelry making to anyone with a kitchen table and a small torch — no forge, no anvil required.
2. How Silver Clay Works: The Science of Sintering
Sintering is what enables silver clay to work — and knowing about it can help you avoid the most common mistakes made during firing.

When heated, silver particles gain energy at their surface atoms. A certain temperature, and those atoms diffuse across particle boundaries, bonding with their neighbors. This forms an uninterrupted metal mesh without the material ever reaching a complete liquid state.
The big idea: more heat and time make for stronger, denser metal. A work that has been fired at 900 C for two hours is far less porous and much more tensile than one that was fired at 650 C for 10 minutes — even if each of them looks “done” on the outside.
⚠️ The “Outer Crust” Problem A piece may seem and feel hard on the outside still only partially sintered inside. This is especially true of torch-fired thick pieces. As for the thickness, always follow the minimum time and temperature recommendations from manufacturers — and add additional time if thicker than 3mm.
That’s also why fully sintered silver clay doesn’t snap when you bend it; it gives a little. If your finished piece is snapping like a biscuit when you apply light pressure, it simply didn’t sinter all the way. You can red-fire it (a few times sometimes) to increase strength.
3. Types of Silver Clay & Brand Comparison (2026)
Silver clay comes in four main forms:
- Lump clay — The standard form. Works like modeling clay. Best for sculpting, texturing, and forming.
- Syringe clay — Clay in a syringe for detail work, line decoration, and repairs. Slightly more fluid than lump clay.
- Paste/slip — Thin liquid clay for joining pieces, filling cracks, and surface coating.
- Sheet/paper clay — Very thin, flexible sheets for origami-style folding and cutting.
Here’s how the major brands compare:
| Brand | Shrinkage | Min. Firing Temp | Open Working Time | Best For |
|---|---|---|---|---|
| PMC3 | 10–15% | 600°C / 10 min | Long (forgiving) | Detailed carving, complex forms |
| Art Clay Silver (ACS) | 8–10% | 650°C / 30 min | Medium | Rings, sized pieces, less shrinkage |
| PMC+ (Sterling) | 12–15% | 900°C / 30 min | Medium | Structural pieces needing hardness |
| Art Clay 950 / 960 | 10–12% | 1000°C / 30 min | Short (dries faster) | Rings, clasps, structural jewelry |
| FYI Metal Clay (Fine Silver) | 10–12% | 650°C / 20 min | Medium–Long | Budget-conscious makers, high recyclability |
Which should you buy as a beginner? Art Clay Silver lump clay is often recommended for first-timers because its lower shrinkage rate makes sizing rings easier. PMC3 is also excellent and has a longer working time, which gives you more leeway when shaping.
4. Essential Tools You Actually Need
Long lists of tools are a staple of silver clay tutorials. Here’s the honest minimum:
Must-Haves
- Non-stick work surface — A piece of glass, ceramic tile or a dedicated metal clay mat. No sticky; wipe with a tiny drop of olive oil.
- Roller — An acrylic roller or smooth glass rod. Keep it clean.
- Thickness guides — Playing cards piled on each side of your clay provide uniform thickness. Three cards = about 2mm.
- Needle tool or cocktail stick — For cutting, carving and piercing holes.
- Slip brush — Small, soft-bristled tool used to apply paste and join pieces. Keep it moist.
- Airtight storage — Wrap excess clay in plastic wrap, then place into a small zip-lock. Silver clay dries out fast.
- Sandpaper — 400, 600 and 1000 grit to refine dry clay before firing.
- Firing setup — A butane or propane torch (for small pieces) or a small kiln.
Nice to Have (But Not Essential at First)
- Texture sheets and stamp sets
- Rubber-tip shaping tools
- Burnisher (for post-fire polishing)
- Stainless steel shot in a rotary tumbler (provides a brilliantly shiny finish with no hand polishing)
💡 Cost-Saving Tip For your first project, get your silver clay in the smallest package available. 10g would be sufficient to make a pendant. Silver clay is pricey — $1.50–$2.50 per gram — so practice with air-dry clay first to nail down your design.

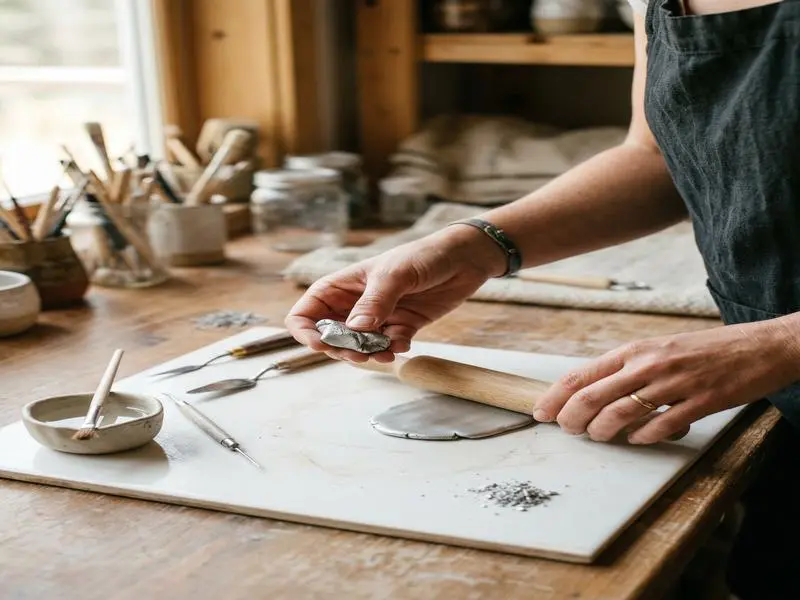
5. Step-by-Step: Making Your First Silver Clay Piece
We will go step-by-step in making a simple, textured pendant from beginning to end.
Step 1 — Make Your Workspace Ready
Rub a little olive oil over your work station. A barely visible, thin film is all it takes. Excess oil makes the clay not retain its shape. Have your roller and thickness guides set.
Step 2 — Condition the Clay
Shape the clayCheck the clay open and peck it It’s something that should feel soft and smooth, like acting modeling clay. If it seems stiff, knead in your palms for 30 seconds. If it’s cracking at the edges, it’s dried out a bit — squeeze a couple drops of water into it and re-knead.
Step 3 — Roll to Thickness
Stack 3 playing cards on each side of your clay, 2 stacks. You roll out the clay with a roller resting on top of stacks of cards — this is what gives you a consistent sheet of 2mm thick clay. For the pendants, do not roll thinner than 1.5mm otherwise the fired piece will be fragile.
Step 4 — Apply Texture
Press texture plastic, or any object with some interesting detail down into the surface. Impression of leaves, lace, coins, and tree bark all have beautiful impressions. And go straight up to avoid smearing.
Step 5 — Cut Your Shape
Cut your pendant shape using a cutter, needle tool, or small cookie cutter. If you’d like to hang it, pierce a hole now with a cocktail stick. Make the hole a little bigger than you think you need — it will shrink.
Step 6 — Allow Your Media to Air Dry Completely
Leave your piece on a non-stick surface and air-dry at room temperature for 1–2 hours at minimum. You can accelerate this on a mug warmer set to low heat (not a hairdryer — air movement dries the surface before the center and creates cracks).
Test: The Mirror Test. When the piece is dry, place it on a mirror or cold glass for 30 seconds. If you notice any droplets on the underside when you lift it, it is still not dry enough. Do not fire wet clay — it will crack or explode.
Step 7 — Sand and Refine
In the dry (greenware) stage, silver clay is as easy to use as chalk. Sand the edges with 400-grit sandpaper to erase fingerprints and refine your shape. 600 very smooth – and then 1000 if you’d like. Firing will reveal any other imperfections that remain.
Use silver clay paste to fill any hairline cracks, dry, and sand once more.
Step 8 — Fire
Check out the entire firing section below. For a small pendant under 10 g, I used a butane torch.
Step 9 — Cool and Quench
Allow the piece to cool on a kiln brick for 2–3 minutes. Fine silver can be quenched (dropped into water) to speed cooling — unlike sterling, it won’t stress-crack.
Step 10 — Finish and Polish
See the finishing section below. Your article is now hunker down solid fine silver.
6. Firing Silver Clay: Torch vs. Kiln

Torch Firing
Best for: Pieces under ~25 grams, the size of a silver dollar, and no thicker than 5mm.
What you need: A butane craft torch or propane torch, a ceramic/kiln fiber firing block and a dimly lit room (to read the flame color).
How to do it:
- Take the dry piece and put it on a firing block out of burnable range.
- Ignite your torch and keep the flame 2–3 inches away from the piece.
- Use the 4- to 6-inch flame or more, moving slowly in circles. You’ll see white smoke — that’s the binder burning off. Keep going.
- The white in the piece will fade into an even salmon-orange glow. That’s around 900°C.
- Keep that glow for as long as recommended (1.5–2 minutes is the standard for a small pendant).
- Remove the flame. The article will display a white matte surface — this typical fine silver.
⚠️ Warning: Do Not Let It Turn Bright White Yellow A bright white or yellow glow indicates the surface temperature is reaching (fine silver’s melting point) ~961°C. Pull the torch back immediately. There is balling from surface melting and loss of fine detail.
Kiln Firing
Best for: Anything and everything, but ideal for large, thick or structural items. Necessary for works with set stones.
Recommended schedule (for maximum strength):
- Ramp to 900°C (1650°F)
- Hold for 2 hours
- Let cool as per kiln instructions
Little is left of Scully’s “racoon” firing process, which packs more silver into its cells than the shorter, hotter fixtures that follow: A 2-hour full fire at 900°C creates measurably denser and harder metal than a 10-minute fire at 600°C — even though both sintered the silver in technical terms. * Always go full schedule on anything that needs strength (rings, clasps).
Can You Fire Gemstones in Silver Clay?
Yes — but it’s only certain stones. Cubic zirconia (CZ) and lab-grown nano gems can handle 100% kiln firing (up to 1675°F). Natural gemstones, most glass and any porous or organic material cannot — they will crack or discolor, shatter.
A technical tip so many tutorials miss: when embedding CZ into silver clay, always leave a small viewing hole at the back of the setting (or otherwise make sure it’s thin where it comes over the stone)! If the CZ is sealed in tightly, those gases are trapped and the stone can become dark or develop a haze. Leaving ventilation — even a small hole — fixes this.
7. Finishing & Polishing After Firing

Raw silver clay, right after it has been fired, appears white and chalky — not jewelry-like at all. That is fine silver in a matte finish, and it is fully sintered metal. Finishing brings out the beauty.
Step 1 — Brass Brush
Burnish the surface using a stiff brass brush (dry, or with a little soap and water) in circular motions. This knocks off the outmost micro-particles, early chatters as you bring up a soft sheen.
Step 2 — Sandpaper Progression
Work through 400 → 600 → 800 → 1200 grit then 2000 grit wet-and-dry paper. Each grit eliminates the scratches from the last one. Don’t rush this — it’s where the finish quality is set.
Step 3- Polishing Cloths or Tumbler
Using a Pro-Polish pad or polishing cloth, employ firm circular motions for a mirror shine. The quickest path to a high mirror finish is a rotary tumbler with stainless steel shot and burnishing compound — you dump in your piece, let it run for 2 hours, and it comes out mirror-bright.
Adding a Patina (Optional)
Liver of sulfur (LOS) provides a rich antique oxidized patina on silver clay that highlights textures with dramatic dimension. Apply it to shiny silver, work it in to whatever level of darkness you’re after and then buff the high points lightly until the contrast comes through.
8. Eight Common Mistakes (And How to Fix Them)
Mistake #1: Not Drying Fully Prior to Firing
What it does: There is no way out for steam from the residual moisture. The piece shatters, breaks or distorts in the kiln/torch.
Fix: Do the mirror test (refer to Step 6 above). If you’re unsure, dry for an additional 30 minutes.
Mistake 2: Rolling Too Thin
What happens: The fired object is brittle and snaps with light treatment.
Fix: Minimum 1.5mm for pendants. 2mm or more for rings. Always use card thickness guides.
Error 3: Handling dry clay with dry hands
What it is: Dry fingertips draw fluids from the clay surface, resulting in tiny fissures and roughness.
Fix: Dampen fingertips lightly when handling dry clay — or work quickly and keep your hands slightly oiled.
Error No. 4: Understanding to a Firing
What it does: The piece appears finished but only small portions are fully sintered in the inside. It tries its best, but snap under wear stress.
Correction: Follow the full firing schedule, not the minimum. A timer and thermocouple kiln takes all the guesswork out.
Mistake No. 5: Calculating the Wrong Ring Size
Why it happens: Companies recognize that fired elements shrink below target size.
Solution: Use a mandrel with shrinkage compensation markings. For ACS (8-10% shrinkage), about 2–3 sizes larger depending on the brand/thickness.
Mistake No. 6: Allowing moisture to escape from the clay while working with it
What it is: Clay gets stiff and unworkable, with surface cracks.
Solution: Work in 5–10 minute blocks. Lay unused clay wrapped in plastic. On dry days, put a damp paper towel close (but not touching) to your work surface.
Mistake 7: Throwing Away Scraps
What it does: Wastes costly silver.
Fix: Gather every bit, grimace and babble of sanding. Store in a sealed container. Add water and knead again to reconstitute. You can also send fired scraps to a metal refiner — silver is very recyclable.
Mistake 8: Firing Unsafe Stones
What it does: At higher temperatures, stones can crack, shatter or discolor.
Correction: Only lab-grown CZ or nano gems for use in the firing of clay. Use bezel settings or cold connections to add natural stones post firing.
9. What Most Silver Clay Tutorials Don’t Tell You
After reviewing dozens of tutorials and community discussions on Reddit, forums like Ganoksin Orchid, and social media, I found several topics that almost never get addressed. Here they are:
The “Hallmarking” Reality Check
In some countries (especially the UK), commercial selling of silver jewelry requires a hallmark — an official assay office mark that establishes metal content. There is a minimum weight and it costs money to get a piece hallmarked. For small inexpensive silver clay charms, the hallmarking fee can even cost more than the piece itself!
If you intend to sell, familiarize yourself with your country’s hallmarking laws before committing big-time to the craft.
Silver Clay Is “Additive Manufacturing” — Not Traditional Metalwork
As critics among experienced jewelers on Ganoksin and Reddit’s r/jewelry have noted, silver clay is pretty stuff but does not have the structural elegance of wrought or fabricated silver. Hinged clasps, solder joints, and box catches are nearly impossible to incorporate into silver clay pieces. Especially for more complex mechanical structures, silver clay shines as just a component — integrated with traditional silversmithing methods.
Electrochemical Compatibility
Silver clay fires to. 999 fine silver. However, if you combine it with sterling silver elements in the same work (ex: a sterling clasp soldered to a fine silver pendant) then you are forming what is called a galvanic couple. The sterling portion may oxidize quicker than the fine silver in humid conditions. Not catastrophic — but worth being aware of if you’re selling pieces.
Long-Term Durability: The Under-Researched Question
The generalisation is that most tutorials are only about the first creation. Few talk about how the silver clay jewelry looks 5 or 10 years down the track. From both community accounts and material science principles, the picture is mostly positive — but with caveats:
The results of fully sintered parts (900°C / 2 hour) are similar to those of ordinary fine silver.
Because under-sintered pieces are weak to stress fractures over time, thin areas in a piece can be quite susceptible.
Fine silver is softer than sterling (Vickers hardness of 25 HV for fine vs. 80 HV for sterling). Rings especially will show wear on the shank more so than a sterling ring.
If durability is a priority, look at Art Clay 950 or PMC Sterling — alloy versions that produce a harder metal at the cost of more complex firing requirements.
💡 Pro Tip from the Community Keep a firing log. Note the piece weight, thickness, kiln temperature, and hold time for every piece you fire. When something comes out weak or perfect, you’ll know exactly why. Over time, your personal data is more reliable than any manufacturer’s minimum spec.
Love Fine Silver? See Our 925 Sterling Silver Collection
HonHo Jewelry crafts handmade sterling silver pieces for retail buyers and wholesale partners worldwide.Browse 925 Silver Jewelry →
10. Is Silver Clay Jewelry Durable? The Honest Answer
The short answer: Yes, if done correctly.
When properly sintered, fine silver has the same physical properties as conventional fine silver stock. It will not come apart, or break down, or decay. Fine silver is, also, more tarnish–resistant than sterling — it has no copper to oxidize.
- The more thorough response turns on knowing what “properly fired” entails in practice:
- Torch-fired pieces hold up better than kiln-fired ones for lightweight pendants and earrings, but less so for rings meant to be worn every day.
- Kiln firing (max time & temperature for fired products): strongly recommend 900°C/ approx.
- The Art Clay 950 series and PMC Sterling formulas fire to yield a harder silver-copper alloy that suits structural applications better.

If you’re looking for professionally manufactured sterling silver jewelry that combines the design freedom of artisan craft with industrial-grade durability, you may also want to explore our custom jewelry services at HonHo Jewelry — we work with wholesale buyers, designers, and boutique retailers globally.
🔑 Key Takeaway
Silver clay is a real material, accessible for making actual fine silver jewelry. Its primary drawback is that fine silver (which is.999 pure) is softer than sterling; for rings and high-wear pieces, opt for an alloy formula (like Art Clay 950 or PMC Sterling) or combine it with traditional metalsmithing in structural components. It’s superb for pendants and earrings, and decorative charms.
Frequently Asked Questions About Silver Clay
What is silver clay made of?
Also referred to as silver clay, the material consists of particles of pure silver (. 999 pure), an organic binder (typically cellulose) and water. Upon firing, the binder burns off and the silver particles are sintered together to create solid fine silver.
So do I need a kiln to fire silver clay?
No. Objects weighing up to around 25 grams (or the size of a silver dollar) can be torch-fired with a butane or propane torch. A kiln provides the greatest strength and is essential for thicker or large components. Kiln firing is highly recommended for everyday rings and functional jewelry.
Silver Clay Shrinkage: How much does it shrink in firing?
Shrinkage depends on the brand. PMC3 shrinks about 10–15%, Art Clay Silver shrinks approximately 8–10%. When making rings or fitted pieces always allow for shrinkage. Refer to brand-specific ring size compensation charts, or try sizing up 2–3 sizes as a baseline.
You mentioned you are firing gemstones inside silver clay.
Yes, but only lab-grown (CZ) cubic zirconia stones and nano gems are reliably safe at full firing temperatures. Most organics, glass gems and natural stones cannot resist 800–900°C and would crack or discolor. When embedding CZ always leave a small hole to ventilate binder gases.
What’s the difference between PMC and Art Clay Silver?
PMC (Precious Metal Clay) was first created by Mitsubishi. Aida Chemical Industries produces Art Clay Silver. Both fire to pure silver. PMC3 has a longer open working time and fires at lower temperatures; Art Clay Silver shrinks less, and some makers find it easier to achieve accurate sizes. Both are great — get a small package of each and see what you prefer.
Is silver clay jewelry durable?
Well fired silver clay is real. 999 pure silver and more than sturdy enough for daily wear. Structural elements such as clasps or hinges might need additional support because fine silver is not as hard as sterling. For silver rings: use alloy formulas (Art Clay 950 or PMC Sterling) which must be fully sintered at the recommended temp for full strength.
How do I prevent cracking in silver clay?
Instead of a direct heat source, dry your piece slowly in open air or on a low-heat mug warmer. Thick pieces need longer drying. Wrap unused clay in plastic tightly while working. No need to hide cracks, use silver clay paste to fill any hairline fractures before firing — once fired they cannot be hidden.
This memory is a very creative use of silver clay.
Yes. Wipe up all dry scraps and sanding dust into a covered container. Add water a drop at a time, knead it gently, and the clay is reconstituted in full. Any fired silver scraps can be placed with a precious metal refiner for recycling — nothing goes to waste. One of the most economical things about working with silver clay.
Related Reading
- What Is 925 Sterling Silver? The Complete Guide →
- Shop Our 925 Silver Jewelry Collection →
- Custom Silver Jewelry Manufacturing Services →
- PMC Guild Learning Resources (External) →
- Cool Tools Metal Clay Resource Center (External) →
Tags:silver claymetal clayprecious metal clayPMC3Art Clay Silversilver clay jewelrysilver clay for beginnerssilver clay firingsilver clay ringsinteringfine silver .999torch firingkiln firingsilver clay tipsLSI: metal clay shrinkageLSI: organic binder silverlong-tail: how to torch fire silver clay without a kilnlong-tail: silver clay jewelry making for beginners step by steplong-tail: best silver clay for ring makinglong-tail: silver clay vs pmc3 2026
Sources & Further Reading:
Holly Gage, “It’s All About the Sintering” — Rio Grande Knowledge Hub | Cool Tools Learning Center — Gemstone Firing Guide | Ganoksin Orchid Forum — Professional Metalsmithing Community | AMCAW (Art & Metal Clay Artists Worldwide) | Art Clay World — Official ACS Technical Specifications
Best Costume Jewelry in 2026: Brands, Materials & Care Guide
HonHo Jewelry is a custom jewelry manufacturer based in Dongguan, China, with 15+ years of
Is Stainless Steel Good for Jewelry? The Full Guide (2026)
Is stainless steel good for jewelry? Walk into any jewelry store today — or scroll

How to Make Rings: Step-by-Step Guide for All Methods (2026)
Arguably, one of the most fulfilling things you can do as a jewelry lover, hobbyist