

If you’re serious about jewelry CAD design, you already know sketches and wax carving only take you so far.
Today, the most precise, complex, and profitable pieces are born as 3D jewelry models—long before metal ever touches the mold. With the right CAD software for jewelry, you can tweak every detail in minutes, visualize different metals and gemstones, and create production‑ready files for 3D printed jewelry and casting.
In this guide, you’ll see how jewelry CAD design works from concept to finished piece, which tools actually matter (like Rhino jewelry plugins, MatrixGold, and more), and how professionals like Dongguan HonHo Jewelry turn a simple idea into a flawless, manufacturing-ready design.
If you want your next custom jewelry design to be faster, cleaner, and more accurate—without guesswork—keep reading.
What Is Jewelry CAD Design?
Simple Definition
Jewelry CAD design (Computer‑Aided Design) is the process of creating digital 3D models of jewelry—rings, pendants, earrings, bracelets—on a computer instead of only on paper or in wax.
You’re not just drawing a pretty picture.
You’re building a precise, measurable 3D model that can go straight to 3D printing, casting, and final manufacturing.
Where CAD Fits in the Jewelry Design Workflow
Think of CAD as the digital center of your jewelry design pipeline:
| Stage | What You Do | How CAD Helps |
|---|---|---|
| Concept & sketch | Discuss ideas, moodboards, quick sketches | Turn ideas into exact 3D forms |
| CAD modeling | Build the full 3D jewelry model | Control size, thickness, stone seats |
| Rendering | Create photorealistic images | Show clients “final look” before making |
| 3D printing / CAM | Print wax/resin model | Export clean STL files |
| Casting & finishing | Cast, set stones, polish | Reduce rework and surprises |
Your jewelry CAD model becomes the single source of truth for designers, setters, and casters.
CAD vs Hand Sketch vs Wax Carving
You don’t have to choose one method forever, but they serve different purposes:
| Method | Strengths | Limits |
|---|---|---|
| Hand sketch | Fast, expressive, great for client talks | No real dimensions, hard to manufacture |
| Wax carving | Good feel for volume, traditional workflow | Slow, hard to edit, fragile, less precise |
| Jewelry CAD | Precise, editable, repeatable, 3D‑ready | Learning curve, needs software + hardware |
In my own workflow, sketches start the conversation,
but CAD modeling finishes it.
From CAD File to 3D Printing and Casting
Once your 3D jewelry model is ready, the pipeline is straightforward:
- Model in CAD (with correct thickness, stone seats, tolerances).
- Export STL or similar 3D file (production‑ready jewelry CAD file).
- Send to a resin 3D printer to print the model or casting tree.
- Use the print for:
- Direct casting (lost wax/lost resin)
- Prototyping (fit and style check before final metal)
This is how digital jewelry design connects directly to 3D printed jewelry and casting without guesswork.
Why Jewelry CAD Skills Matter Now
If you design jewelry today, CAD is no longer “nice to have.” It’s a core skill.
Why it matters:
- Clients expect customization – custom ring CAD, engagement ring CAD design, personalized pieces on demand.
- Brands demand speed – fast revisions, multiple collections, tight seasons.
- Manufacturing is digital – casters and printers ask for clean STL files for jewelry.
- Global work – you can send files anywhere and collaborate with setters and casters worldwide.
- Quality & consistency – same model, same result, every time.
Mastering jewelry CAD modeling makes you more competitive, more efficient, and far more scalable as a designer or brand.
Why Jewelry CAD Design Is a Game Changer
Jewelry CAD design completely changes how I handle custom pieces, from engagement ring CAD design to complex 3D printed jewelry collections.
Key advantages: precision, symmetry, complex geometry
With modern CAD software for jewelry (Rhino, MatrixGold, 3Design, etc.), I can:
- Hit perfect symmetry on shanks, halos, and pavé layouts
- Control exact dimensions for metal thickness and gemstone setting
- Build complex, organic jewelry shapes that are almost impossible by hand
- Save parametric jewelry design templates to reuse and tweak fast
That level of precision is what turns a nice idea into a production‑ready jewelry CAD file.
Faster custom projects and approvals
Jewelry CAD modeling lets me move from idea to approval in days, not weeks:
- Build a custom ring CAD or pendant concept in 3D
- Send screenshots, turntable videos, or quick renders for feedback
- Adjust size, stone shape, or details in minutes instead of remaking a wax
For global customers who want fast, clear communication, this speed is a huge advantage.
Unlimited revisions and rapid iterations
Because the design is digital, I can:
- Offer unlimited CAD revisions without restarting from scratch
- Test multiple versions of the same design (different center stone sizes, band widths, settings)
- Save every iteration, so clients can compare options side by side
This is exactly what you want for high‑value custom engagement ring CAD design and bespoke pieces.
Photorealistic jewelry rendering for sales & marketing
With jewelry 3D rendering, I can show clients:
- Realistic metal colors (925, 14K, 18K, platinum)
- Accurate gemstone cuts, colors, and reflections
- Final‑looking images before a single gram of metal is used
Those renders work not just for approvals, but also for online catalogs, pre‑orders, and OEM jewelry presentations if you’re working with a manufacturing partner like a direct wholesale jewelry factory.
Less waste, fewer errors in production
Good jewelry manufacturing CAD cuts risk and cost:
- Correct dimensions mean fewer casting issues and misfits
- Clean STL files for jewelry mean fewer 3D printing failures
- You only cast what’s approved, which reduces metal waste and rework
- Technical checks in CAD help avoid weak prongs, thin shanks, or problem areas before production
For brands and designers working at scale or with low MOQs, this level of control is exactly why jewelry CAD for 3D printing and casting has become the standard.
Best Jewelry CAD Software Options
When we talk about jewelry CAD design, the right software decides how fast you work, how clean your models are, and how happy your clients feel. Here’s a straight, practical breakdown.
Quick Overview: Top Jewelry CAD Software
| Software | Best For | Skill Level | Main Strength |
|---|---|---|---|
| Rhino 3D | All‑round 3D jewelry modeling | Intermediate+ | Flexible, huge ecosystem, works with many plugins |
| MatrixGold | Custom rings & engagement ring CAD design | Intermediate–Pro | Jewelry‑focused tools, presets, parametric edits |
| 3Design | Retail, collections, parametric workflows | Intermediate–Pro | Strong parametric engine, store‑friendly |
| Jewelry CAD Dream | Power users & technical modelers | Pro | Deep jewelry tools, heavy on precision & logic |
Rhino for Jewelry (RhinoGold, Grasshopper, Drakon)
Rhino is the “base camp” for a lot of professional jewelry CAD modeling:
- Rhino + RhinoGold (or similar plugins): ready‑made tools for shanks, heads, halos, settings.
- Rhino + Grasshopper + Drakon: ideal for parametric jewelry design, patterns, and repetitive details.
- Great when you work with serious production partners or want to build production‑ready jewelry CAD files and STL files for jewelry for 3D printing and casting.
If you already work with manufacturers or studios like a global jewellery manufacturer for custom designs such as Dongguan HonHo Jewelry’s custom design service, Rhino-based workflows plug in very naturally.
MatrixGold for Custom Rings & Engagement Ring CAD
MatrixGold is basically Rhino tailored for jewelers:
- Pre‑built tools for custom ring CAD, engagement ring CAD design, eternity bands, and settings.
- Parametric history: you can change finger size, stone size, or halo width in minutes.
- Ideal for:
- Retail stores offering custom jewelry CAD design
- Studios doing lots of one‑off engagement rings and bridal sets
- Designers who need fast, accurate model changes for clients
3Design for Parametric & Retail Workflows
3Design is popular with brands and retail chains that think in collections:
- Strong parametric jewelry design: change stone size or metal thickness without rebuilding.
- Great for:
- Consistent collections (same design, different sizes/stone layouts)
- Retail teams who need repeatable, editable templates
- Good fit if you’re building a scalable jewelry design workflow inside a store or brand.
Jewelry CAD Dream & Niche Tools
Jewelry CAD Dream is built for advanced users who live in 3D
Jewelry CAD Design Workflow Step by Step

1. Turn a Client Idea into a CAD Concept
I always start with the client’s idea:
- Collect sketches, inspiration photos, finger size, metal, gemstone details, budget.
- Translate that into a rough 3D jewelry CAD design concept, focusing on overall style (minimal, vintage, organic, bold, etc.).
- Decide early if this will be a custom ring CAD, pendant, earrings, or a full set, so the proportions and structure make sense.
2. Block Out the Basic 3D Shape
Next, I build clean base forms before any decoration:
- Create the main body: shank for rings, base plate for pendants, hoops or studs for earrings.
- Check core dimensions: band width, height off the finger, pendant size, earring weight/volume.
- Keep geometry simple and solid at this stage to avoid technical issues later.
3. Model the Jewelry Details
Then I add all the design elements that define the piece:
- Build prongs, channels, bezels, halos, galleries, and under‑structures in 3D.
- Add engravings, filigree, milgrain, and patterns for organic jewelry shapes.
- Keep symmetry and clean transitions so the 3D jewelry modeling is both beautiful and manufacturable.
4. Set Gemstones in CAD
Accurate gemstone setting in CAD is non‑negotiable:
- Position stones for prong, bezel, pavé, and channel settings with correct seat depth.
- Respect real‑world tolerances for girdle protection and spacing between stones.
- For engagement ring CAD design, I double‑check center stone height, security, and comfort on the hand.
5. Check Thickness, Comfort, and Strength
Before export, I run through a production checklist:
- Verify minimum metal thickness for shanks, settings, and connecting parts.
- Smooth inside edges and contact areas for comfortable long‑term wear.
- Remove weak points, undercuts, or sharp corners that can snag or break in daily use.
If you’re designing heavy or wide bands (or even pieces like spinning rings), this step is critical for durability and comfort.
6. Prepare Files for 3D Printing or Casting
Once the model is solid and clean, I prep it for manufacturing:
- Convert to watertight solids and generate optimized STL files for jewelry.
- Check scale, orientation, and wall thickness for resin 3D printing and cad casting jewelry workflows.
- Adapt the file if the job will go to direct casting, rubber molding, or CNC machining.
7. Review, Revise, and Approve with the Client
The last step is all about alignment and trust:
- Create simple turntable videos or jewelry 3D rendering images from the CAD model.
- Walk the client through profile views, top views, and stone layout for fast approvals.
- Apply edits (size tweaks, stone changes, detail adjustments) until the production‑ready jewelry CAD files are locked in.
Once approved, the same digital jewelry design files go straight into cad prototyping jewelry or final production, keeping the process fast, accurate, and repeatable.
Design Rules for Production‑Ready Jewelry CAD

When I model jewelry in CAD, I design it as if it’s going to the caster tomorrow. No “concept art” – only production‑ready jewelry CAD files.
Minimum Metal Thickness (Real‑World Safe Values)
Use these as practical starting points (you can tweak for alloy and factory, but don’t go thinner without talking to your caster):
- Rings (shank)
- Light ring: 1.3–1.5 mm minimum thickness
- Everyday band: 1.6–1.8 mm
- Wide bands: 1.8–2.2 mm (to avoid bending and cracking)
- Prongs
- Small stones (≤1.5 mm): 0.6–0.7 mm at the thinnest point
- Center stones: 0.8–1.0 mm minimum at the neck
- Pendants & earrings
- Main walls: 1.0–1.2 mm
- Bails, hooks, posts: 0.9–1.1 mm
- Bracelets & chains
- Structural parts: 1.5–2.0 mm depending on style and wear
Always confirm these numbers with your local caster or factory; different markets and materials (like stainless, silver, or brass) handle thickness differently. If you’re working with stainless steel name pieces, take a look at how we build our custom stainless steel name bar necklaces to see realistic production thicknesses.
Safe Gemstone Setting Dimensions in CAD
In jewelry CAD modeling, stone security is non‑negotiable:
- Seat size
- Hole/seat usually 0.05–0.1 mm smaller than stone diameter (for gemstones), a bit tighter for diamonds if the setter prefers.
- Prong coverage
- Aim for 30–40% of the stone’s girdle covered by each prong.
- Bezel settings
- Bezel wall: 0.5–0.7 mm above the girdle
- Wall thickness: 0.8–1.0 mm (thicker for big stones)
- Pavé & melee
- Distance between stones: 0.15–0.25 mm minimum to keep metal between seats
- Channel settings
- Channel walls: 0.7–1.0 mm thick
- Enough height to cover the stone’s girdle solidly
Always model with your setter’s preferences in mind. Ask what tolerances they want from your 3D jewelry modeling, then lock those into your templates.
Design for Comfort, Wearability, and Durability
A beautiful piece that hurts to wear is a failed design. In CAD:
- Comfort
- Use comfort‑fit interiors on rings (slight inside curve).
- Round inner edges on bangles, pendants, and earrings.
- Balance
- Pendants: center the bail over the mass so it doesn’t twist.
- Earrings: keep weight close to the ear to prevent droop.
- Durability
- No ultra‑thin bridges or decorative lines under 0.6–0.7 mm in metal.
- Support halos, galleries, and openwork with hidden ribs or crossbars.
Avoid Weak Points, Sharp Edges, and Snag Areas
Most real‑world complaints come from these three problems:
- Weak points
- Super skinny connections between shank and head
- Over‑pierced designs with tiny unsupported details
- Long, thin parts (e.g., dangles) with no structural backing
- Sharp edges
- Chamfer or fillet everything that touches skin:
- Back of pendants
- Earring edges
- Inside of rings and bracelets
- Avoid 90° knife‑edges at the top of rings unless they’re thick enough and slightly softened.
- Chamfer or fillet everything that touches skin:
- Snag‑prone areas
- High prongs that stick out too far
- Open claws on pavé
- Sharp tips or corners on halos and decorative elements
Round, soften, or protect anything that could catch on clothes, hair, or bags.
Clean Files and Optimized STL for Jewelry CAD Production
Production‑ready jewelry CAD isn’t just about how it looks; it’s about how it prints and casts:
- Before STL export
- Make sure all solids are closed (watertight)
- Fix naked edges, overlapping surfaces, and self‑intersections
- Delete hidden junk geometry (old versions, construction curves, unused parts)
- Keep wall thickness consistent where possible
- STL settings
- Use a fine mesh: small chord height and angle (e.g., max deviation 0.01–0.02 mm) for clean curves.
- Avoid monster file sizes – find the sweet spot where curves look smooth but files are still manageable.
- Check orientation so the caster or 3D print tech can understand the model instantly.
- Final checks
- Measure all critical areas: thickness, stone seats, finger size, chain hole sizes.
- Run a quick virtual section cut through rings and settings to see if anything is too thin.
If you treat every digital jewelry design as if it’s going straight to casting, you’ll spend less time fixing issues and more time creating pieces that actually work in real life.
Common Jewelry CAD Challenges and Fixes
Jewelry CAD design has a learning curve, but most problems are repeatable – and fixable – once you know what to look for.
1. Steep Learning Curve for Jewelry CAD Beginners
The first wall is usually the interface and 3D thinking.
- Start with one main software (Rhino, MatrixGold, or 3Design) and stay there until you’re comfortable.
- Follow step‑by‑step beginner jewelry CAD tutorials focused on rings and simple bands, not generic product design.
- Build muscle memory: repeat the same model (simple solitaire ring, basic pendant) a few times until you can do it faster and cleaner.
2. Getting Smooth, Organic Jewelry Shapes
Blocky, mechanical forms happen when you model everything with straight extrudes and hard booleans.
- Use curves and surface tools (sweep, loft, blend) to build shanks, bezels, and organic jewelry shapes.
- Add soft fillets and blends on edges that touch skin.
- Work at a larger scale (e.g., model in millimeters but zoom in a lot) so you can refine micro‑curves and transitions.
3. Avoiding CAD Models That Fail in Casting or Printing
A design that looks good on screen can still fail in metal.
- Always check minimum metal thickness (e.g., 0.8–1.0 mm for small details in silver, more for gold and structural parts).
- Don’t create paper‑thin prongs, galleries, or under‑bridges just to look delicate in a render.
- Confirm shrinkage allowances and support needs with your caster or manufacturer; professional factories that handle CAD casting jewelry
Using Jewelry CAD Design With 3D Printing and Casting

How jewelry CAD connects to resin 3D printing workflows
In jewelry CAD design, your 3D model is exported as an STL (or 3MF) file, then sent to a resin 3D printer. The workflow is simple:
- Model in CAD → export STL → import into slicer → add supports → print in castable resin → clean, cure, then invest and cast.
If you work with professional manufacturers or studios like Chinese custom jewelry factories and vendors, this is exactly the digital pipeline they expect.
Choosing resolution and support strategy
For 3D jewelry modeling, detail is everything:
- Layer height: 25–50 microns for most rings, 10–25 microns for micro‑pavé and sharp engraving.
- Orientation: Tilt rings/pendants so supports avoid visible areas (tops of prongs, main surfaces).
- Supports:
- Light supports for pavé, filigree, and thin walls
- Avoid supports on tiny claws, sharp edges, and stone seats
Good support strategy means cleaner castings and less polishing work.
When to 3D print prototypes vs direct casting
Use your jewelry CAD files in two ways:
- Prototype prints (non‑castable resin):
- For checking size, thickness, comfort, and design proportions
- Ideal for high‑value pieces or first‑time customers
- Direct casting from prints (castable resin or wax):
- When design and size are fully approved
- For custom rings, engagement ring CAD design, and one‑off bespoke pieces
Prototypes cost a bit more time but can save you from expensive metal mistakes.
How CAD speeds up custom rings and one‑off pieces
With digital jewelry design, you can:
- Duplicate a ring and test multiple shank shapes, head styles, or halo sizes in minutes
- Swap stone sizes or change finger sizes without redrawing the whole piece
- Send fast photorealistic jewelry renders for approval, then go straight to printing
This is exactly why custom jewelry CAD design dominates modern engagement ring workflows.
Quality checks before sending CAD files to printers or casters
Before you export your production‑ready jewelry CAD files:
- Check wall thickness: no under‑thick areas that might break in casting
- Verify stone seats: prong, bezel, and channel sizes match actual gemstone measurements
- Fix geometry: no naked edges, bad booleans, or non‑manifold areas
- Scale and tolerance: confirm ring size, pendant length, chain holes, and clearances
High‑quality STL files for jewelry mean fewer print failures, smoother casting, and less rework for you and your manufacturing partner or wholesale jewelry manufacturer.
When to Hire Professional Jewelry CAD Services
Signs you should outsource jewelry CAD design
You should consider professional jewelry CAD services when:
- Your sketches look good on paper but you can’t turn them into clean 3D jewelry CAD models.
- You’re losing time fighting software instead of selling or designing.
- Your 3D prints keep failing or castings come back with porosity, wrong sizes, or weak prongs.
- You run a brand or store and need consistent, production‑ready STL files on a deadline.
- You’re scaling up custom jewelry CAD design orders and can’t keep up in‑house.
Outsourcing lets you keep control of design and client relationships while a pro handles the technical CAD modeling.
How pro jewelry CAD modelers work from
How to Start Learning Jewelry CAD Design

Pick your first jewelry CAD software
If you’re fresh to jewelry CAD design, don’t overthink the software at the start:
- For complete beginners:
- Rhino (with basic jewelry plugins) – flexible, huge community.
- MatrixGold CAD – built specifically for custom rings and engagement ring CAD design.
- For Mac users or retail teams:
- 3Design jewelry software – parametric tools, good for repeatable models and store setups.
Keep it simple: choose one tool, stick with it for at least 3–6 months, and ignore “software hopping.”
Use free trials and student licenses
Most CAD software for jewelry offers ways to get started cheap or free:
- Free trials (Rhino, MatrixGold, 3Design) – perfect for 30–90 days of deep practice.
- Student licenses – if you’re in a course, use heavily discounted education versions.
- Light / cut‑down versions – fewer tools, but enough to learn 3D jewelry modeling basics.
Set a daily goal: 30–60 minutes of modeling during your trial — treat it like a short bootcamp.
Learn from jewelry CAD courses and communities
You don’t need to figure it out alone. For beginner jewelry cad tutorial content:
- YouTube: search “Rhino jewelry design”, “MatrixGold CAD tutorial”, “3D jewelry modeling basics”.
- Paid courses: platforms like Udemy, Domestika, or localized training centers near major jewelry hubs.
- GIA and major institutes: GIA and other academies offer jewelry CAD course programs that are structured and recognized globally.
- Communities: Facebook groups, Reddit, and Discord servers for digital jewelry design and 3D printed jewelry help you get real feedback.
Training from vendors and independent teachers
Most leading software vendors and pro studios run solid training:
- Software vendors: official MatrixGold, Rhino, and 3Design classes (online and in-person).
- Independent teachers: jewelers who teach custom jewelry CAD design one‑on‑one via Zoom.
- Production studios: some manufacturers and service bureaus share training when you work with them, especially if you’re building long‑term cooperation for manufacturing in places like China or Mexico. If you’re planning to scale collections later, look for teachers who understand real‑world production and work with established partners such as top-tier China jewelry manufacturers.
Simple learning path: from cubes to custom rings
Keep your jewelry design workflow structured:
- Week 1–2: basic shapes (bands, simple pendants, hoops), boolean operations, fillets.
- Week 3–4: details — prongs, bezels, channels, halos, simple engravings.
- Month 2–3: full custom ring CAD – shank + head + gemstone setting cad + under‑gallery.
- After that: organic jewelry shapes, pavé, parametric jewelry design (Rhino Grasshopper jewelry).
Repeat the same model type several times until you can build it fast and clean.
Portfolio tips for new jewelry CAD designers
Your first portfolio doesn’t need 50 pieces. It needs clean, believable, production‑ready jewelry CAD files:
- Show 5–10 strong pieces: rings, engagement ring cad design, earrings, and at least one complex piece.
- Include screenshots of the CAD model + STL previews + jewelry 3D rendering (simple photorealistic jewelry renders are enough).
- Mention technical notes: metal thickness, gemstone sizes, and whether models are stl files for jewelry ready for printing/casting.
- If you’ve collaborated with a caster or manufacturer, add 1–2 photos of finished pieces and note that the design passed real cad prototyping jewelry and production.
Aim your portfolio at the type of clients you want — custom engagement work, brand collections, or jewelry CAD services as a freelancer.
Practical Tips to Improve Your Jewelry CAD Skills
If you want to get truly fast and confident with jewelry CAD design, you need a clear routine and a system. Here’s exactly what I recommend.
1. Daily CAD Practice (Short, Focused)
Aim for 30–60 minutes a day instead of one long session a week:
- Pick one focus per day: shanks, prongs, halos, bezels, pavé, etc.
- Time‑box exercises:
- 15 min: rebuild a simple band
- 15 min: build one stone setting from scratch
- 15 min: add filigree or organic details
- Repeat the same model a few times and push yourself to use fewer commands and cleaner geometry.
This builds speed, muscle memory, and better 3D jewelry modeling habits.
2. Reverse‑Engineer Real Jewelry
Use real pieces as your best teachers:
- Grab a ring, pendant, or earrings you like and measure everything (calipers help a lot).
- Rebuild it in your jewelry CAD software and match:
- Proportions (shank width, height, stone size)
- Curves and profiles (inside comfort fit, outside taper)
- Gemstone setting cad details (prong thickness, seat depth)
- Compare your CAD model to the real piece and adjust until it feels identical.
This trains your eye for production‑ready jewelry CAD files, not just pretty renders.
3. Build Your Own Reusable Parts Library
Stop modeling the same things from scratch every time:
- Save shanks, heads, prong sets, halos, bails, and patterns as a personal library.
- Organize them by:
- Stone shape (round, oval, pear, princess, etc.)
- Stone size ranges
- Style (solitaire, halo, vintage, minimal)
- Use these parts to speed up custom ring CAD work and keep your style consistent.
Over time, this becomes a huge asset for fast custom jewelry CAD design and client work.
4. Use References and Measurements Properly
Don’t guess. Work from real data:
- Ask clients for clear photos, finger size, stone sizes, and any existing jewelry they love (e.g., a favorite engagement ring).
- Bring images into your CAD viewport as background reference and trace main lines and proportions.
- Use exact measurements for:
- Gemstone diameter and depth
- Shank width and thickness
- Gap between stones, prongs, and edges
Strong references = fewer revisions and more accurate digital jewelry design.
5. Get Feedback From Jewelers, Setters, and Casters
The fastest way to grow is to let manufacturing experts tear your models apart (in a good way):
- Show your CAD models and STL files for jewelry to a bench jeweler or caster and ask:
- “Where is this too thin or too fragile?”
- “Would you change these prongs / channels / gallery?”
- “Any areas that will trap polishing compound or cause porosity?”
- Note their comments and build a checklist for every new design:
- Minimum thickness met?
- Enough metal under and around stones?
- No razor‑sharp edges or snag points?
This is exactly how pro jewelry CAD services and studios refine models before cad casting jewelry or 3D printing.
As you improve your CAD skills, you’ll also design better pieces for real‑world styling, from custom engagement rings to everyday layering sets that pair well with pieces like our own custom‑designed earrings.
FAQ: Jewelry CAD Design Basics
Best CAD software for beginner jewelry designers
For beginners, I usually recommend:
| Level | Software | Why it’s good |
|---|---|---|
| Starter | Rhino + basic jewelry plug‑ins | Huge community, tons of tutorials, affordable, works for all 3D jewelry modeling |
| Easy UI | MatrixGold | Jewelry‑focused tools, guided workflows, great for custom ring CAD |
| Budget | FreeCAD / Blender (with add‑ons) | Zero license cost, good to learn 3D thinking before moving to pro tools |
If your goal is professional manufacturing and working with a factory or custom jewelry manufacturer, start with Rhino or MatrixGold — they’re industry standards and connect well to full jewelry manufacturing workflows.
Typical time to create a custom jewelry CAD model
Rough time frames (after you’re reasonably skilled):
| Piece type | CAD time (average) |
|---|---|
| Simple band / pendant | 1–2 hours |
| Halo or multi‑stone ring | 3–5 hours |
| Detailed pavé engagement ring | 4–8 hours |
| Very complex / organic piece | 1–3 days (with revisions) |
Beginners can expect 2–3x these times until they build muscle memory.
Can jewelry CAD files go straight to 3D printing?
Yes, but only if they’re production‑ready:
- Model must be watertight (no naked edges, no gaps)
- Correct minimum thickness for casting
- Correct stone seat sizes and tolerances
- Exported as a clean STL file (or 3MF) at proper resolution
Most pro studios always run checks and often print a test prototype before casting, especially for custom engagement ring CAD designs.
CAD renderings vs finished jewelry pieces
CAD renderings are:
- Digital images (often photorealistic) used for approvals and marketing
- Perfect lighting, no scratches, ideal stone color and clarity
- Sometimes slightly exaggerated prongs, edges, or reflections for visual impact
Finished jewelry is:
- A physical piece with real metal and stones
- Subject to casting, polishing, and setting tolerances
- May look a bit softer or slimmer than the CAD render (especially prongs and edges)
Use renders to sell the idea; use technical CAD views and measurements to control reality.
How pro studios ensure accuracy, fit, and quality
Professional jewelry CAD services follow a strict pipeline:
- Precise measurements
- Ring size, stone sizes (caliper / certificate), finger profile
- Technical design rules
- Checked metal thickness, setting depths, under‑gallery comfort
- Digital and physical checks
- CAD cross‑sections and measurement tools
- Resin test print or metal master when needed
- Close loop with manufacturer
- Feedback from casters, setters, and polishers
- Adjust CAD to match the specific factory’s tolerances
Studios like ours, and established partners such as custom jewelry manufacturers for small businesses, lock in this pipeline so that what you see in CAD is what you get in the final piece — in size, fit, and overall look.
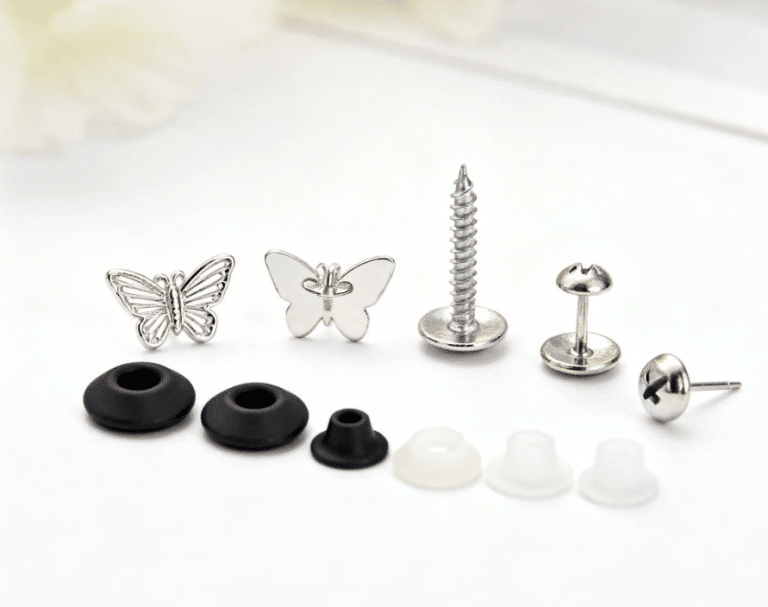
The Unseen Hero: Why Earring Backings Define Quality Jewelry
Every jewelry brand owner knows the sinking feeling. A customer calls, distraught. They’ve lost one
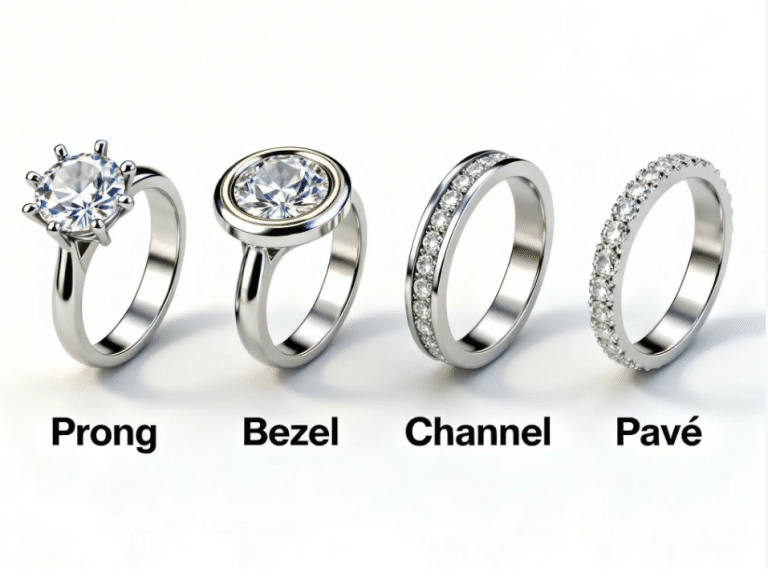
Choosing the Best Jewelry Stone Setting for Mass Production
Selecting the right jewelry stone setting is one of the most pivotal decisions for any
Best Jewelry Stone Setting for Mass Production | HonHo
Choosing the best jewelry stone setting Choosing the best jewelry stone setting is one of